1. BigCommerce UPS Shipping Onboarding Guide
Get started with UPS Shipping on BigCommerce. Step-by-step onboarding covering account connection, settings, and first shipment.
Step-by-Step Guide
Guide to Setting Up UPS Shipping with BigCommerce
This guide provides a step-by-step process for setting up UPS shipping with your BigCommerce store. It's designed for store owners who want to integrate UPS shipping services seamlessly into their e-commerce operations.
Register or Log In to UPS Dashboard
Begin by registering for a free UPS Shipping Dashboard account or logging in if you already have one. This is the first step to integrating UPS shipping with your BigCommerce store.
Visit the registration page at https://ups.dashboardlink.com/register to create a new account. If you already have an account, log in at https://ups.dashboardlink.com/login. Ensure you have your login credentials ready for a smooth process.
→ https://ups.dashboardlink.com/register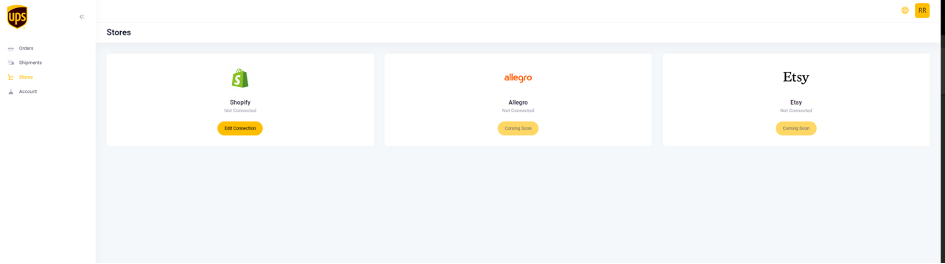
Connect BigCommerce Store
Connect your BigCommerce store to the UPS Dashboard using the Custom App approach. This connection is essential for managing your shipping operations.
After logging into your UPS Dashboard, navigate to https://ups.dashboardlink.com/de/stores. Click on the 'Edit Connection' button for BigCommerce to establish the connection. Ensure your store details are correctly entered to avoid connection issues.
→ https://ups.dashboardlink.com/de/stores
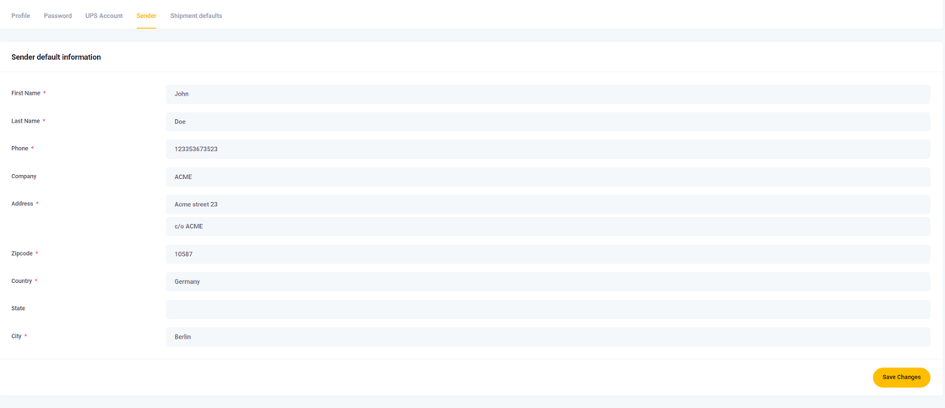
Set Default Shipping Values
Configure default shipping values such as Shipper Information and Measurement system. These defaults streamline the shipping process.
Go to https://ups.dashboardlink.com/user/profile# and open the 'Sender' tab to enter your Sender details. Then, set default package measurements under the 'Shipment defaults' tab. These defaults apply when no specific dimensions are provided by the commerce system.
→ https://ups.dashboardlink.com/user/profile#
Enter Sender Details
Add your Sender information to be prefilled for every order.
Ensure all necessary fields are completed to avoid delays in processing shipments.
Set Package Measurement Defaults
Configure default package dimensions for shipments.
These settings are used when specific dimensions are not provided by the system, but you can modify them before printing a label.

Link UPS Account
Link your UPS account to the dashboard to enable shipping services. This step is crucial for accessing UPS shipping rates and services.
Open the 'UPS Account' tab on the dashboard and enter the required information to link your UPS account. Ensure all details are accurate to avoid any issues with shipping services.

Create BigCommerce UPS Shipping Rates
Set up shipping rates in BigCommerce that start with 'UPS' to filter UPS-specific orders in the dashboard. This helps in managing and viewing relevant orders easily.
Name your shipping rates based on the UPS service you intend to use, such as 'UPS Standard' or 'UPS Express'. This naming convention is necessary for the dashboard to display only the relevant orders.

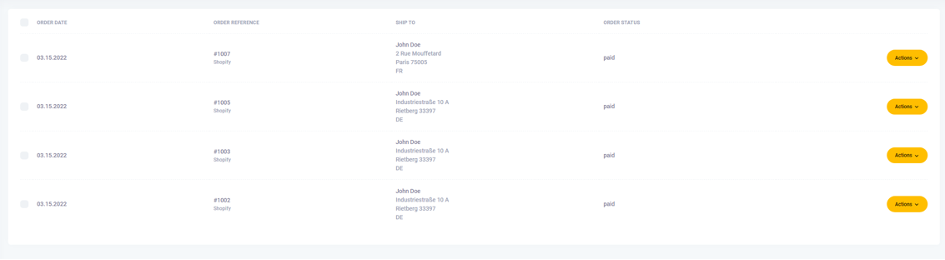
Manage Orders and Shipments
View and manage open orders on the UPS Dashboard. This step involves creating shipments and shipping labels for your orders.
Access all open orders at https://ups.dashboardlink.com/orders. Use the 'Action' button to view order details or create shipping labels. This functionality helps streamline the shipping process.
→ https://ups.dashboardlink.com/orders
View Order Details
Get an overview of order details and perform necessary actions.
The order details page allows you to create labels and update tracking information, ensuring accurate order processing.

Create Shipment/Shipping Label
Add missing information and configure shipment details before creating a shipping label.
Ensure all mandatory fields are completed, and configure the UPS service and packaging options. Once ready, click 'Create Shipping' to generate the label and move the order to the 'Shipments' section.

Access Support
Reach out for support if you encounter any issues with the UPS Dashboard. Support is available to assist with any technical difficulties.
Open a support case by visiting https://ecommerce.help/service/shipping/ups-plugins/#ticket or email upsplugins@ecommerce.help for assistance. Ensure you provide detailed information about your issue for a quicker resolution.
→ https://ecommerce.help/service/shipping/ups-plugins/#ticket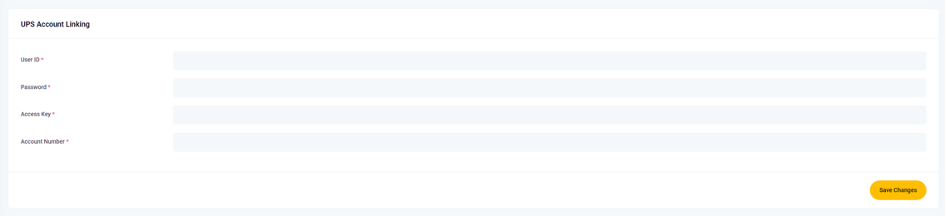
Reset Your Password
Follow the steps to reset your password if you encounter login issues. This ensures continued access to your UPS Dashboard account.
If you receive a message indicating incorrect credentials, select 'Forgot password?' and enter your email address. Follow the instructions in the password reset email to regain access. Contact support if issues persist.