


2. Tariffe Live UPS per WooCommerce
Configura le Tariffe Live UPS per visualizzare i costi di spedizione in tempo reale al checkout di WooCommerce. Copre le impostazioni delle tariffe, i servizi e i test.
Guida passo dopo passo
Accedi al Dashboard UPS e al Backend di WooCommerce
Assicurati di essere connesso a ups.dashboardlink.com. Apri una seconda scheda e accedi al tuo backend di WooCommerce.
→ https://ups.dashboardlink.com/Install the UPS Live Rates plugin in WooCommerce.
Install the UPS Live Rates plugin in WooCommerce.
→ https://link.ecommerce.help/ups-plugins-woocommerce/live-rates
Go to WooCommerce settings.
Go to WooCommerce settings.
Navigate to shipping and select shipping zones.
Navigate to shipping and select shipping zones.
Choose UPS services to display in the checkout for the specific zone.
Choose UPS services to display in the checkout for the specific zone.

Example: Add UPS standard service for the zone of Germany.
Example: Add UPS standard service for the zone of Germany.
Once selected, the UPS services should be activated.
Once selected, the UPS services should be activated.
Proceed to checkout and add a proper address to see UPS standard rates.
Proceed to checkout and add a proper address to see UPS standard rates.
To display additional services, go back to the shipping zone settings.
To display additional services, go back to the shipping zone settings.
Select another service (e.g., UPS Express) and refresh the page to view both rates.
Select another service (e.g., UPS Express) and refresh the page to view both rates.
In the eCommerce shipping dashboard, configure topics for live rates.
In the eCommerce shipping dashboard, configure topics for live rates.

Include time and transit information and use negotiated rates.
Include time and transit information and use negotiated rates.
To display negotiated rates, add the UPS account number in the specified section.
To display negotiated rates, add the UPS account number in the specified section.
Carica e Installa il Plugin Tariffe Live UPS
Nel backend di WooCommerce, naviga alla sezione plugin dove puoi caricare un nuovo plugin. Scegli il file del plugin UPS scaricato. Clicca sul pulsante "Installa Ora". Attiva il plugin una volta installato.
→ https://link.ecommerce.help/ups-plugins-woocommerce/live-ratesCollega le Tariffe Live UPS
Dopo l'attivazione, trova il plugin nella tua panoramica dei plugin. Clicca sul plugin e individua l'opzione delle tariffe live UPS. Clicca sul pulsante delle tariffe live UPS per avviare la connessione. Accedi a UPS, accetta i termini e le condizioni e clicca su continua.
Configura le Tariffe Live
Verrai reindirizzato al tuo dashboard di spedizione UPS. Inizia la configurazione delle tue tariffe live all'interno del dashboard di spedizione UPS. Vai alle impostazioni di WooCommerce. Naviga a spedizione e seleziona le zone di spedizione. Scegli i servizi UPS da visualizzare al checkout per la zona specifica. Esempio: Aggiungi il servizio standard UPS per la zona della Germania.

Attiva i Servizi e Testa
Una volta selezionati, i servizi UPS dovrebbero essere attivati. Procedi al checkout e aggiungi un indirizzo corretto per vedere le tariffe standard UPS. Per visualizzare servizi aggiuntivi, torna alle impostazioni della zona di spedizione. Seleziona un altro servizio (ad es. UPS Express) e aggiorna la pagina per visualizzare entrambe le tariffe. Nel dashboard di spedizione eCommerce, configura gli argomenti per le tariffe live. Includi informazioni sui tempi e sul transito e utilizza tariffe negoziate.
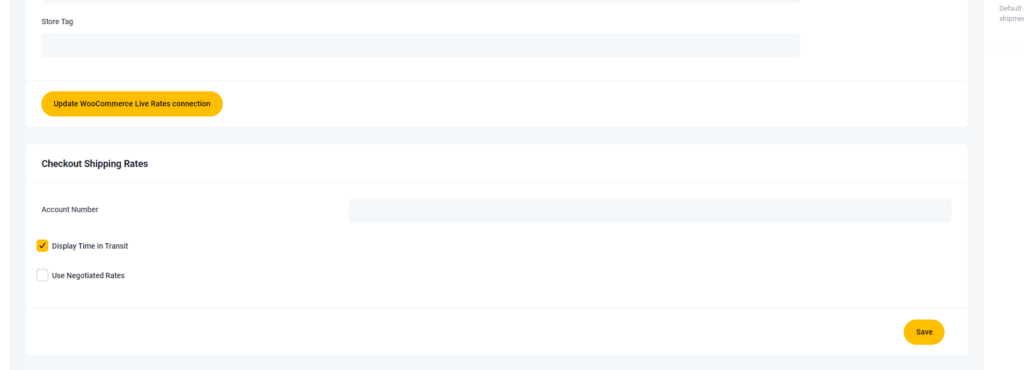
Tariffe Negoziate
Per visualizzare le tariffe negoziate, aggiungi il numero di conto UPS nella sezione specificata.