


1. Guide d'Intégration Shopify
Guide d'intégration complet pour l'expédition UPS sur Shopify. Couvre la configuration du compte, la connexion du magasin et la configuration du premier envoi.
Guide étape par étape
Intégration Complète de l'Expédition UPS sur Shopify
This guide provides a step-by-step process for setting up UPS shipping with your Shopify store. It is designed for Shopify store owners who want to integrate UPS shipping services seamlessly.
Enregistrer ou Se Connecter au Tableau de Bord UPS
Begin by registering a new account or logging into your existing UPS Dashboard account.
Visit https://ups.dashboardlink.com/register to create a new account. If you already have an account, log in at https://ups.dashboardlink.com/login.
→ https://ups.dashboardlink.com/register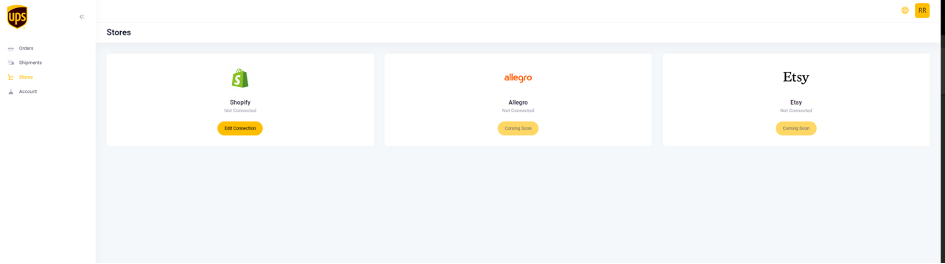
Connecter la Boutique Shopify
Link your Shopify store to the UPS Dashboard using Shopify's Custom App approach.
After logging into your dashboard, navigate to https://ups.dashboardlink.com/de/stores and click on the 'Edit Connection' button for Shopify. Follow the instructions to create a Custom App on Shopify.
→ https://www.youtube.com/watch?v=GxALZdLJugg&list=PL1Di4jfnWLgssa5mdaoyYzoaInJgTbLaL&index=12
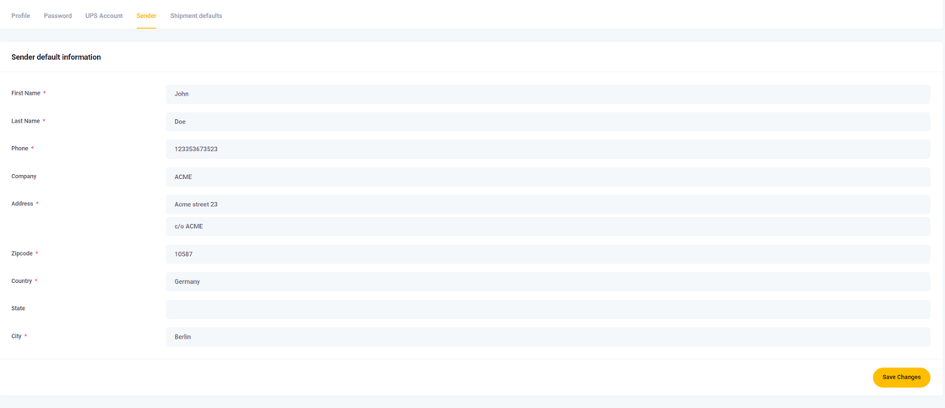
Définir les Valeurs Par Défaut
Configure default settings such as Shipper Information and Measurement system.
Navigate to https://ups.dashboardlink.com/user/profile# and open the 'Sender' tab to add your Sender details. Then, set up default package measurements under the 'Shipment defaults' tab. These defaults apply if the commerce system doesn't provide dimensions, but you can modify them before printing a label.
→ https://www.youtube.com/watch?v=YqMVbdU-j10&list=PL1Di4jfnWLgssa5mdaoyYzoaInJgTbLaL&index=14
Lier le Compte UPS
Connect your UPS account to the dashboard to enable shipping services.
Open the 'UPS Account' tab on the dashboard and enter the required information to link your UPS account. This step is crucial for processing shipments through UPS.
→ https://www.youtube.com/watch?v=i8n3ibCv0fo&list=PL1Di4jfnWLgssa5mdaoyYzoaInJgTbLaL&index=15
Créer des Tarifs d'Expédition UPS sur Shopify
Set up shipping rates in Shopify that are specific to UPS services.
Create shipping rates in Shopify with names starting with 'UPS' to filter UPS-specific orders in the dashboard. For detailed instructions, refer to the Shopify Help Center: https://help.shopify.com/en/manual/shipping/setting-up-and-managing-your-shipping/setting-up-shipping-rates.
→ https://help.shopify.com/en/manual/shipping/setting-up-and-managing-your-shipping/setting-up-shipping-rates
Créer un Envoi
Manage open orders and create shipping labels for them.
Visit https://ups.dashboardlink.com/orders to view open orders. Use the 'Action' button to view order details or create a shipping label.

Voir les Détails de la Commande
Access detailed information about each order.
The order details page provides an overview and allows you to create a label or update tracking information.

Créer une Étiquette d'Expédition
Finalize shipment details and generate a shipping label.
Select 'Create Shipment' to review and complete order information. Ensure sender and receiver details are correct, and configure UPS service and packaging. Click 'Create Shipping' to generate the label and move the order to the 'Shipments' section.
→ https://www.youtube.com/watch?v=Cf70Oe9D51I&list=PL1Di4jfnWLgssa5mdaoyYzoaInJgTbLaL&index=4
Support et Dépannage
Get help and resolve issues with the UPS Dashboard.
For support, email upsplugins@ecommerce.help. If you encounter login issues, use the 'Forgot password?' link to reset your password. If problems persist, contact support.
Reset Password
Instructions for resetting your password if you can't log in.
If your credentials don't match, select 'Forgot password?', enter your email, and follow the link sent to reset your password. Contact support if this doesn't resolve the issue.
